From creating your video content, to uploading videos, you’ll discover tips and tricks that will make creating your online VBS a breeze! Watch the full conversation and check out the info below!
Question & Answer
Pre-record vs. Livestream?
VBS Directors who’ve already held their online VBS have recommended pre-recording your videos vs. livestreaming. It takes the pressure off and allows you to have more control when it’s time to “go live”.
How long should the finished videos be in order to hold kids interest?
When we created the modifications for online VBS, we kept the total content time to 2 hours, which is about the length of time that families would sit down to watch a movie together. However, we’ve also heard from VBS Directors that they did up to 3 hrs and people were still asking for more!
How do you engage kids with online VBS? Will it be like school?
One VBS Director stated that school is compulsory and VBS is voluntary and kids are going to be excited for something different! This content is highly-interactive and engaging, just like it would be in person.
How do you keep VBS safe and secure in an online format?
Zoom has recently updated with several security upgrades. All events now require a password to enter now. You can make that easy for participants by embedding the password in the link you provide parents. You can do this when you set up your event by selecting the box that says “encrypt the password in the link”.
Another way to secure your Zoom Crew Rooms is to set up virtual waiting rooms. These allow you to admit every participant individually, so you that everyone who is in the room is supposed to be there.
Finally, once you are in the room, you can “lock” the meeting so no one else can join.
Creating & Editing Videos
Creating your videos:
- What type of equipment do I need?
- You can use any type of camera. We’ve seen videos created entirely on smartphones and videos created with high-tech video cameras. Whatever you have access to will be perfect!
- What format should I shoot in?
- Shoot in a horizontal format so it matches the videos from Group and the “pause” slides you’ll be creating.
- What are some good tips for presenting VBS on camera?
- Share the Best Practices: Presenting 101 with anyone who is going to be on camera for your VBS.
Creating your transition slides/images:
- Transition slides or “pause” slides are how you prompt kids to answer questions or gather supplies. It can also be a way to move on to the next section
- Specs for the slides/images: 1920 pix x 1080 pix
- Background images and videos from Group:
Creating your final video:
- Compile all your assets into one folder (ex: your filmed station videos, KidVid Videos, Music Videos, transition slides, music)
- Determine what editing software you want to use
- Free/Trial-based options:
- imovie for Mac users
- Lightworks
- Shotcut
- Options with a cost:
- Camtasia
- Adobe Premier Pro
- Movavi
- Free/Trial-based options:
- Import your files into whichever program you’re using and then drag over to the timeline in whatever order you’d like!
- NOTE: If you’re nervous about this part, reach out to your congregation, you might have an editing pro that would be willing to put together your videos for you!
Exporting your videos:
- Once your done creating your videos, you need to export them:
- Export videos to h.254 mp4’s. YouTube and Facebook do their own separate compression on the upload.
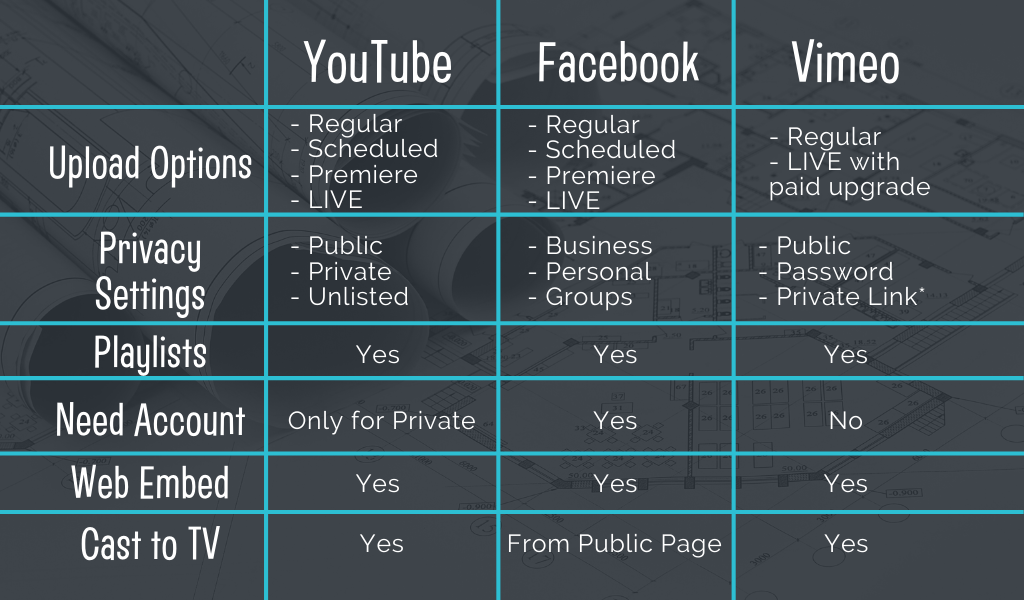
Uploading/Posting videos:
You have a few different options for uploading and posting videos. We broke them down into a chart below. Once you’ve decided how you’re going to share your videos, be sure to communicate the plan to your families.